[ - 수업 목표 - ]
- 수업 목표
1. Flask 프레임워크를 활용해서 API를 만들 수 있다.
2. '화성에 땅사기' API를 만들고 클라이언트에 연결한다.
3. '스파르타피디아' API를 만들고 클라이언트와 연결한다.
[ 01. 4주차 오늘 배울 것 ]
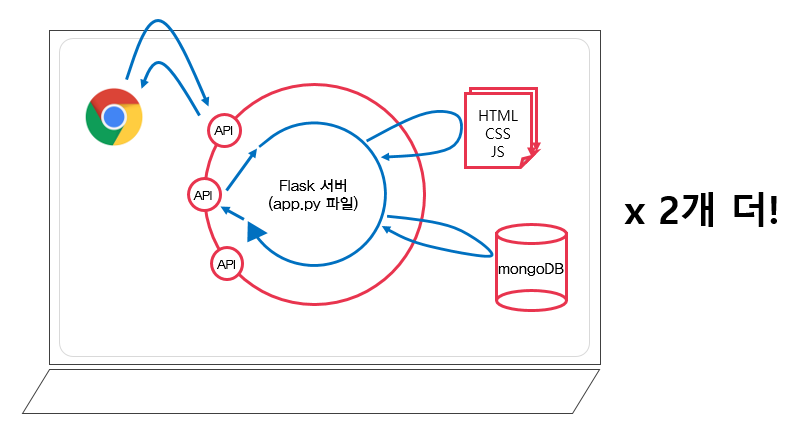
- 오늘 배울것 이야기 - 4주차: Flask, 미니프로젝트1, 미니프로젝트2
HTML과 mongoDB까지 연동해서 API 서버를 만들어 봄.

- 학습에 필요한 추가 폴더(디렉토리) 만들기
백엔드 - 프론트엔드를 연결하는 과정을 하기 위해 5개의 미니 프로젝트를 진행해 봄.
기존 트레이닝을 위한 메인 폴더 아래에 다섯개의 추가 폴더를 만들고 시작함. 각각의 폴더는 파이참에서 별도의 프로젝트 폴더로 사용될 계획임.
prac : "flask 연습 코드를 작성합니다." (오늘)
mars : "화성땅공동구매" 관련 코드를 작성합니다. (오늘)
movie : "스파르타피디아" 관련 코드를 작성합니다. (오늘)
homework : "팬명록" 관련 코드를 작성합니다. (오늘 숙제!)
bucket : "버킷리스트" 관련 코드를 작성합니다. (5주차)
[ 02. Flask 시작하기 - 서버만들기 ]
- prac 폴더에서 연습 프로젝트 시작하기
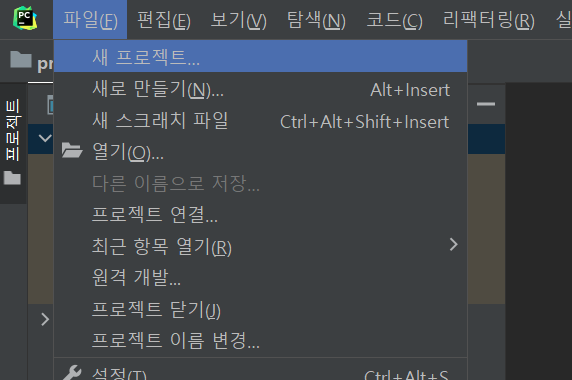
1. Flask 프레임웍 테스트를 위한 연습 프로젝트 만들기
파이참의 메뉴에서 파일 -> 새 프로젝트 -> 프로젝트 경로를 앞서 만들어 놓은 prac 폴더를 선택

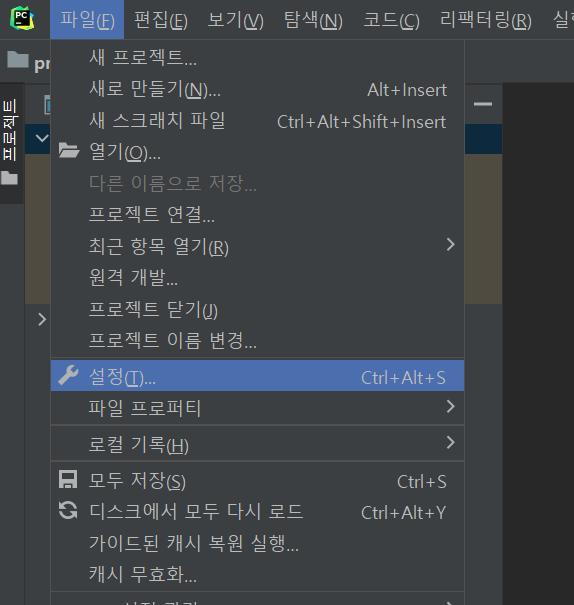
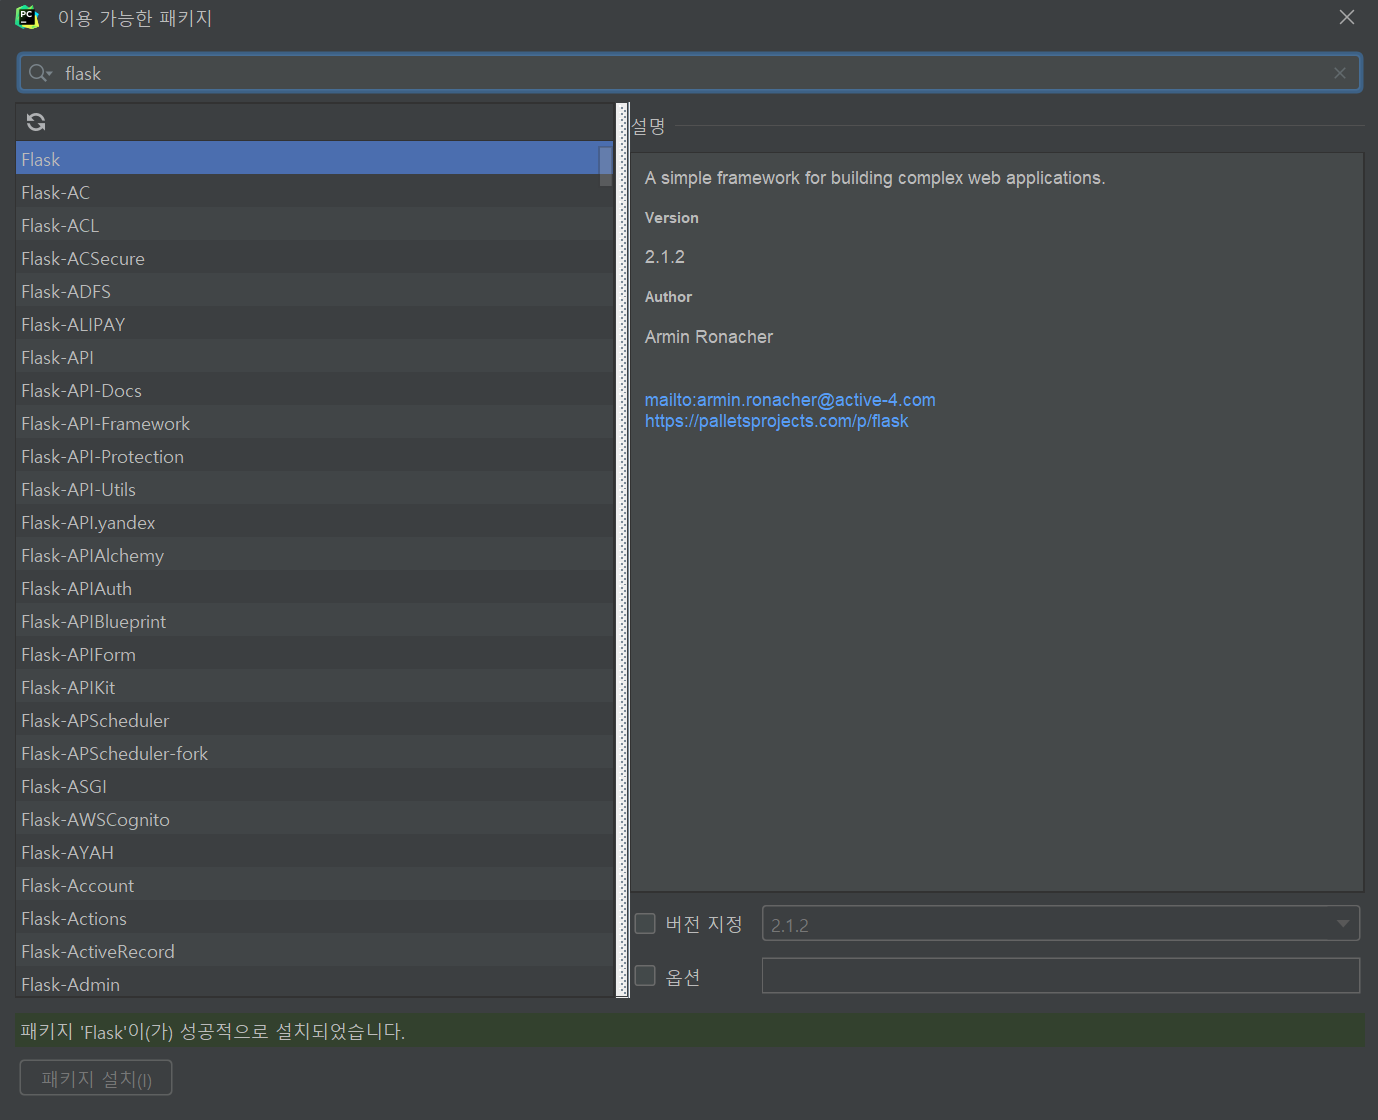
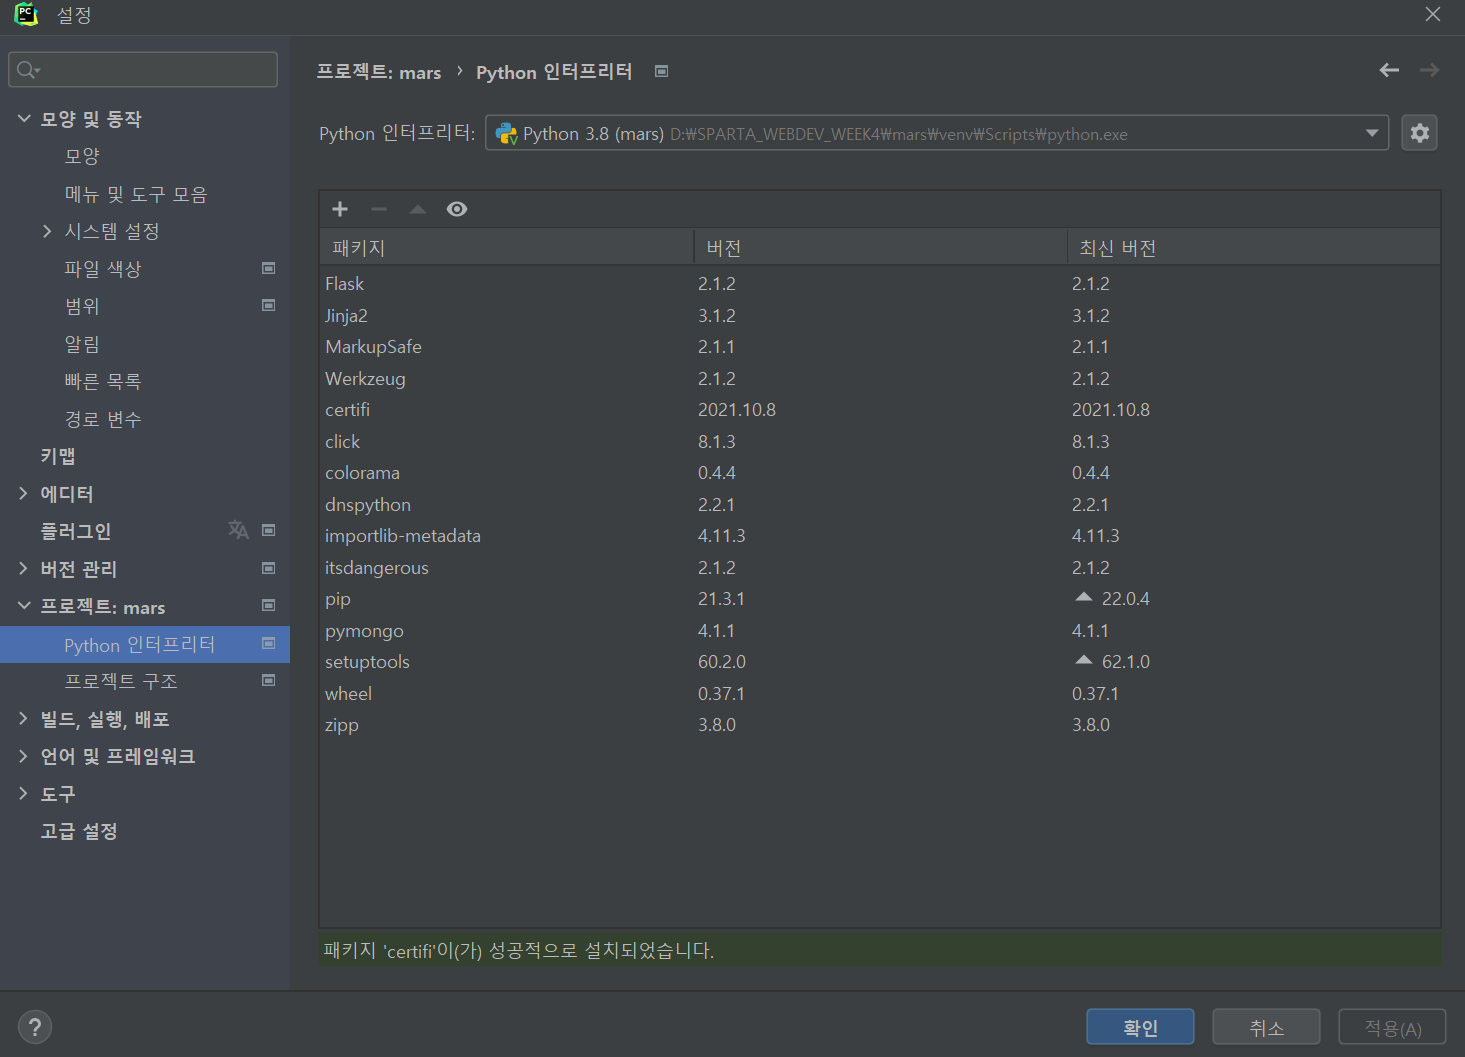
2. python 패키지 설치
파이참의 메뉴에서 파일 -> 설정 -> 프로젝트: prac -> Python 인터프리터 -> 오른쪽 패널의 + 버튼을 눌러서 추가 패키지를 설치한다.

- Flask 기초 : 기본 실행
1. Flask 프레임워크: 서버를 구동시켜주는 편한 코드 모음. 서버를 구동하고 사용하는데 필요한 다양한 python 코드들의 집합.
app.py를 만들어서 간단한 web application server를 만들어보자.
from flask import Flask
app = Flask(__name__)

@app.route('/')
def home():
   return 'This is Home!'

if __name__ == '__main__':
   app.run('0.0.0.0',port=5000,debug=True)
2. 코드 실행 결과
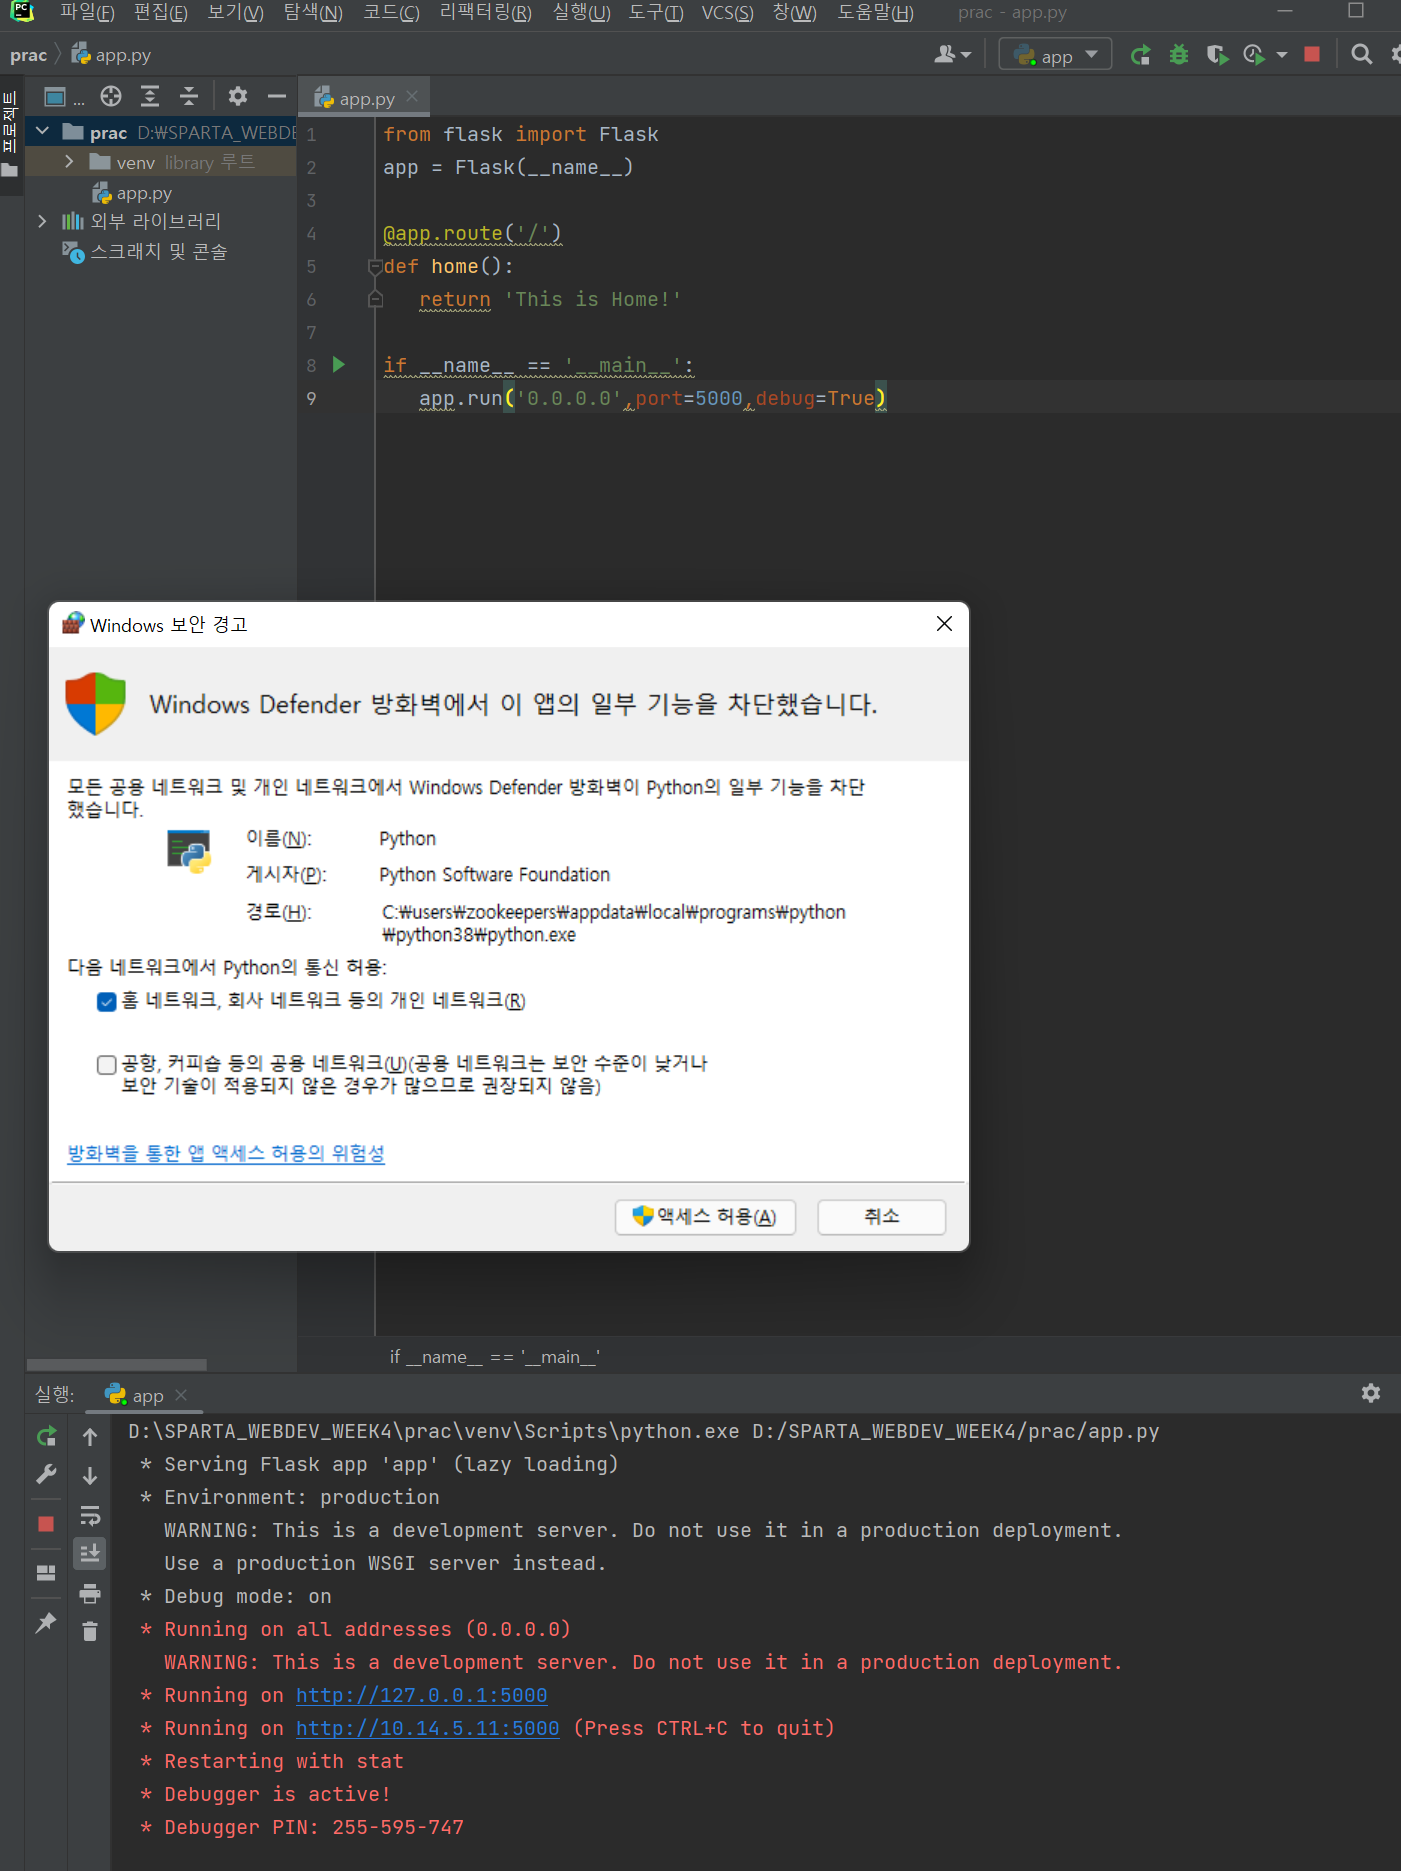
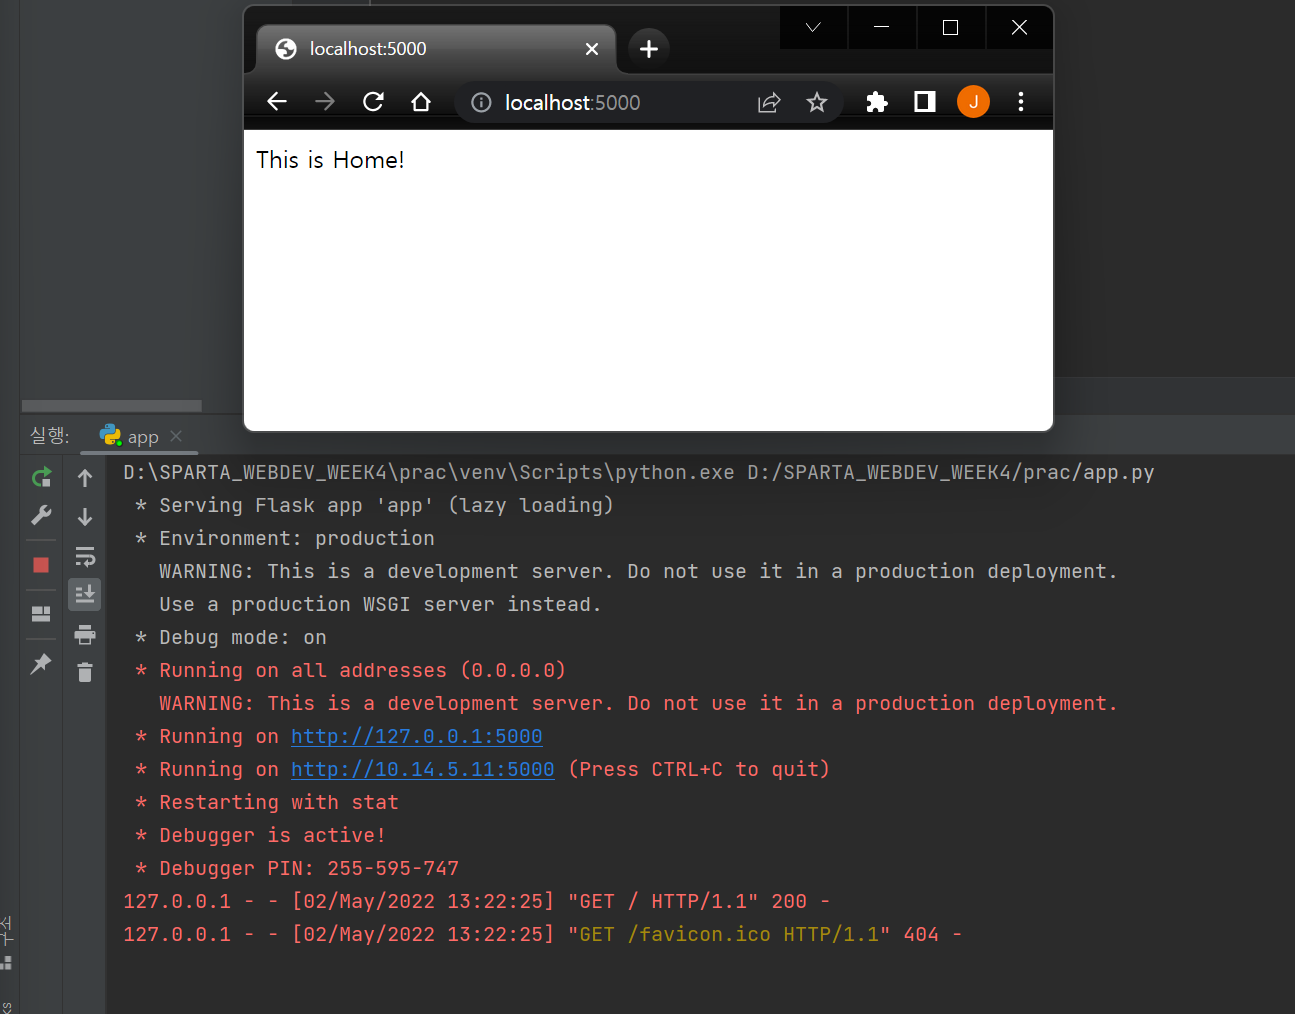
localhost에 5000번 포트로 서비스가 오픈되며, 서버로서 동작함.
3. 크롬에서 http://localhost:5000/ 으로 접속
4. 터미널창에서 ctrl+c 키를 눌러서 서버를 종료
- Flask 기초 : URL 나눠보기
코드에서 @app.route('/') 부분을 수정해서 URL을 나눌 수 있음.
단, url별로 함수명이 같거나, route('/') 내의 주소가 같으면 안됨.
from flask import Flask
app = Flask(__name__)

@app.route('/')
def home():
   return 'This is Home!'

@app.route('/mypage')
def mypage():
   return 'This is My Page!'

if __name__ == '__main__':
   app.run('0.0.0.0',port=5000,debug=True)
[ 03. Flask 시작하기 - HTML 파일 주기 ]
- Flask 기초 : 기본 폴더 구조
1. 프로젝트 폴더 안에 아래와 같이 보통 구성하고 시작.
ㄴstatic 폴더 (이미지, css파일을 넣어둡니다)
ㄴtemplates 폴더 (html파일을 넣어둡니다)
ㄴapp.py 파일(보통 flask로 개발된 경우 app.py 파일로 시작함.)
ㄴvenv 폴더 (실제로는 없는듯이... python 패키지 및 virtual environment 구성과 관련한 정보들이 들어 있음.)
- Flask 기초 : HTML 파일 불러오기
templates 폴더의 역할은 HTML 파일을 담아두고, 불러오기 위한 저장소 역할을 함.
1. 간단한 index.html 파일을 templates 안에 만들기
<!DOCTYPE html>
<html lang="en">
<head>
    <meta charset="UTF-8">
    <meta name="viewport" content="width=device-width, initial-scale=1.0">
    <script src="https://ajax.googleapis.com/ajax/libs/jquery/3.5.1/jquery.min.js"></script>
    <title>Document</title>

    <script>
        function hey(){
            alert('안녕!')
        }
    </script>
</head>
<body>
    <button onclick="hey()">나는 버튼!</button>
</body>
</html>
2. html 파일 불러오기
flask 내장함수 render_template를 이용해서 html 파일 로딩.
from flask import Flask, render_template
app = Flask(__name__)

## URL 별로 함수명이 같거나,
## route('/') 등의 주소가 같으면 안됩니다.

@app.route('/')
def home():
   return render_template('index.html')

if __name__ == '__main__':
   app.run('0.0.0.0', port=5000, debug=True)
[ 04. Flask 시작하기 - 본격 API 만들기 ]
- 들어가기 전에 :GET, POST 요청타입 - 리마인드
클라이언트가 요청 할 때에도, "방식"이 존재. HTTP 라는 통신 규약을 따름. 클라이언트는 요청할 때 HTTP request method(요청 메소드)를 통해, 어떤 요청 종류인지 응답하는 서버 쪽에 정보를 알려줌.
GET, POST 방식
여러가지 요청 방식 중 GET과 POST 방식을 사용해 봄.
* GET → 통상적으로! 데이터 조회(Read)를 요청할 때
예) 영화 목록 조회
→ 데이터 전달 : URL 뒤에 물음표를 붙여 key=value로 전달
예) google.com?q=북극곰
* POST → 통상적으로! 데이터 생성(Create), 변경(Update), 삭제(Delete) 요청 할 때
예) 회원가입, 회원탈퇴, 비밀번호 수정
→ 데이터 전달 : 바로 보이지 않는 HTML body에 key:value 형태로 전달
- GET, POST 요청에서 클라이언트의 데이터를 받는 방법
1. jQuery 임포트(여기서는 jQuery를 이용한 예제 사용)
<script src="https://ajax.googleapis.com/ajax/libs/jquery/3.5.1/jquery.min.js"></script>
2. GET 요청 API 코드
@app.route('/test', methods=['GET'])
def test_get():
   title_receive = request.args.get('title_give')
   print(title_receive)
   return jsonify({'result':'success', 'msg': '이 요청은 GET!'})
3. GET 요청 확인 Ajax 코드
$.ajax({
    type: "GET",
    url: "/test?title_give=봄날은간다",
    data: {},
    success: function(response){
       console.log(response)
    }
  })
4. POST 요청 API 코드
@app.route('/test', methods=['POST'])
def test_post():
   title_receive = request.form['title_give']
   print(title_receive)
   return jsonify({'result':'success', 'msg': '이 요청은 POST!'})
5. GET 요청 확인 Ajax 코드
$.ajax({
    type: "POST",
    url: "/test",
    data: { title_give:'봄날은간다' },
    success: function(response){
       console.log(response)
    }
  })
[ 05. 화성땅 공동구매 - 프로젝트 세팅 ]
- 문제 분석 - 완성작부터 보기
1. mars : "화성땅공동구매" 관련 코드를 작성합니다. (오늘)
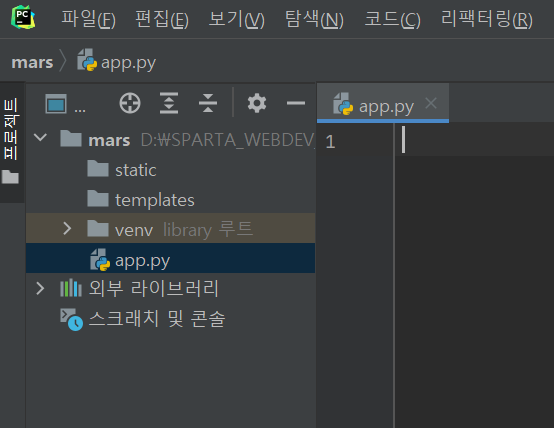
- 프로젝트 설정 - flask 폴더 구조 만들기
static, templates 폴더, app.py 만들기
- 패키지 추가 설치하기
flask, pymongo, dnspython, certifi(보안 연결 for mongoDB)
[ 06. 화성땅 공동구매 - 뼈대 준비하기 ]
- 프로젝트 준비 - app.py 준비하기
화성땅 공동 구매 - app.py
from flask import Flask, render_template, request, jsonify
app = Flask(__name__)

@app.route('/')
def home():
   return render_template('index.html')

@app.route("/mars", methods=["POST"])
def web_mars_post():
    sample_receive = request.form['sample_give']
    print(sample_receive)
    return jsonify({'msg': 'POST 연결 완료!'})

@app.route("/mars", methods=["GET"])
def web_mars_get():
    return jsonify({'msg': 'GET 연결 완료!'})

if __name__ == '__main__':
   app.run('0.0.0.0', port=5000, debug=True)
- 프로젝트 준비 - index.html 준비하기
화성땅 공동 구매 - templates/index.html
<!DOCTYPE html>
<html lang="en">
<head>
    <meta charset="UTF-8">
    <meta http-equiv="X-UA-Compatible" content="IE=edge">
    <meta name="viewport" content="width=device-width, initial-scale=1.0">

    <link href="https://cdn.jsdelivr.net/npm/bootstrap@5.0.2/dist/css/bootstrap.min.css" rel="stylesheet"
        integrity="sha384-EVSTQN3/azprG1Anm3QDgpJLIm9Nao0Yz1ztcQTwFspd3yD65VohhpuuCOmLASjC" crossorigin="anonymous">
    <script src="https://ajax.googleapis.com/ajax/libs/jquery/3.5.1/jquery.min.js"></script>
    <script src="https://cdn.jsdelivr.net/npm/bootstrap@5.0.2/dist/js/bootstrap.bundle.min.js"
        integrity="sha384-MrcW6ZMFYlzcLA8Nl+NtUVF0sA7MsXsP1UyJoMp4YLEuNSfAP+JcXn/tWtIaxVXM"
        crossorigin="anonymous"></script>

    <link href="https://fonts.googleapis.com/css2?family=Gowun+Batang:wght@400;700&display=swap" rel="stylesheet">

    <title>선착순 공동구매</title>

    <style>
        * {
            font-family: 'Gowun Batang', serif;
            color: white;
        }

        body {
            background-image: linear-gradient(0deg, rgba(0, 0, 0, 0.5), rgba(0, 0, 0, 0.5)), url('https://cdn.aitimes.com/news/photo/202010/132592_129694_3139.jpg');
            background-position: center;
            background-size: cover;
        }

        h1 {
            font-weight: bold;
        }

        .order {
            width: 500px;
            margin: 60px auto 0px auto;
            padding-bottom: 60px;
        }

        .mybtn {
            width: 100%;
        }

        .order > table {
            margin : 40px 0;
            font-size: 18px;
        }

        option {
            color: black;
        }
    </style>
    <script>
        $(document).ready(function () {
            show_order();
        });
        function show_order() {
            $.ajax({
                type: 'GET',
                url: '/mars',
                data: {},
                success: function (response) {
                    alert(response['msg'])
                }
            });
        }
        function save_order() {
            $.ajax({
                type: 'POST',
                url: '/mars',
                data: { sample_give:'데이터전송' },
                success: function (response) {
                    alert(response['msg'])
                }
            });
        }
    </script>
</head>
<body>
    <div class="mask"></div>
    <div class="order">
        <h1>화성에 땅 사놓기!</h1>
        <h3>가격: 평 당 500원</h3>
        <p>
            화성에 땅을 사둘 수 있다고?<br/>
            앞으로 백년 간 오지 않을 기회. 화성에서 즐기는 노후!
        </p>
        <div class="order-info">
            <div class="input-group mb-3">
                <span class="input-group-text">이름</span>
                <input id="name" type="text" class="form-control">
            </div>
            <div class="input-group mb-3">
                <span class="input-group-text">주소</span>
                <input id="address" type="text" class="form-control">
            </div>
            <div class="input-group mb-3">
                <label class="input-group-text" for="size">평수</label>
                <select class="form-select" id="size">
                  <option selected>-- 주문 평수 --</option>
                  <option value="10평">10평</option>
                  <option value="20평">20평</option>
                  <option value="30평">30평</option>
                  <option value="40평">40평</option>
                  <option value="50평">50평</option>
                </select>
              </div>
              <button onclick="save_order()" type="button" class="btn btn-warning mybtn">주문하기</button>
        </div>
        <table class="table">
            <thead>
              <tr>
                <th scope="col">이름</th>
                <th scope="col">주소</th>
                <th scope="col">평수</th>
              </tr>
            </thead>
            <tbody>
              <tr>
                <td>홍길동</td>
                <td>서울시 용산구</td>
                <td>20평</td>
              </tr>
              <tr>
                <td>임꺽정</td>
                <td>부산시 동구</td>
                <td>10평</td>
              </tr>
              <tr>
                <td>세종대왕</td>
                <td>세종시 대왕구</td>
                <td>30평</td>
              </tr>
            </tbody>
          </table>
    </div>
</body>
</html>
- 프로젝트 준비 - mongoDB Atlas 창 띄워두기
mongoDB Atlas 주소 (이전 과정에서 연결 작업까지 마무리 했음. 본인의 DB를 띄워 놓으면 됨.)
MongoDB Cloud
MongoDB Cloud is a unified data platform for modern applications and includes a global cloud database, search, data lake, mobile, and application services.
www.mongodb.com
[ 07. 화성땅 공동구매 - POST 연습(주문 저장) ]
- API 만들고 사용하기 - 이름, 주소, 평수 저장하기 (Create -> POST)
1. 요청 정보 : URL= /mars, 요청 방식 = POST
2. 클라(ajax) → 서버(flask) : name, address, size
3. 서버(flask) → 클라(ajax) : 메시지를 보냄 (주문 완료!)
- 클라이언트와 서버 연결 확인하기
1. 서버 코드 - app.py
@app.route("/mars", methods=["POST"])
def mars_post():
    sample_receive = request.form['sample_give']
    print(sample_receive)
    return jsonify({'msg': 'POST 연결 완료!'})
2. 클라이언트 코드 - index.html
function save_order() {
    $.ajax({
        type: 'POST',
        url: '/mars',
        data: { sample_give:'데이터전송' },
        success: function (response) {
            alert(response['msg'])
        }
    });
}

<button onclick="save_order()" type="button" class="btn btn-warning mybtn">주문하기</button>
- 서버부터 만들기
name, address, size 정보를 받아서, 저장
일전에 만들어둔 dbtest.py 파일 참조
@app.route("/mars", methods=["POST"])
def mars_post():
    name_receive = request.form['name_give']
    address_receive = request.form['address_give']
    size_receive = request.form['size_give']

    doc = {
        'name': name_receive,
        'address': address_receive,
        'size': size_receive
    }

    db.orders.insert_one(doc)

    return jsonify({'msg': '주문 완료!'})
- 클라이언트 만들기
이번엔 name, address, size 정보를 보내주면 됨.
function save_order() {
    let name = $('#name').val()
    let address = $('#address').val()
    let size = $('#size').val()

    $.ajax({
        type: 'POST',
        url: '/mars',
        data: { name_give:name, address_give:address, size_give:size },
        success: function (response) {
            alert(response['msg'])
            window.location.reload()
        }
    });
}
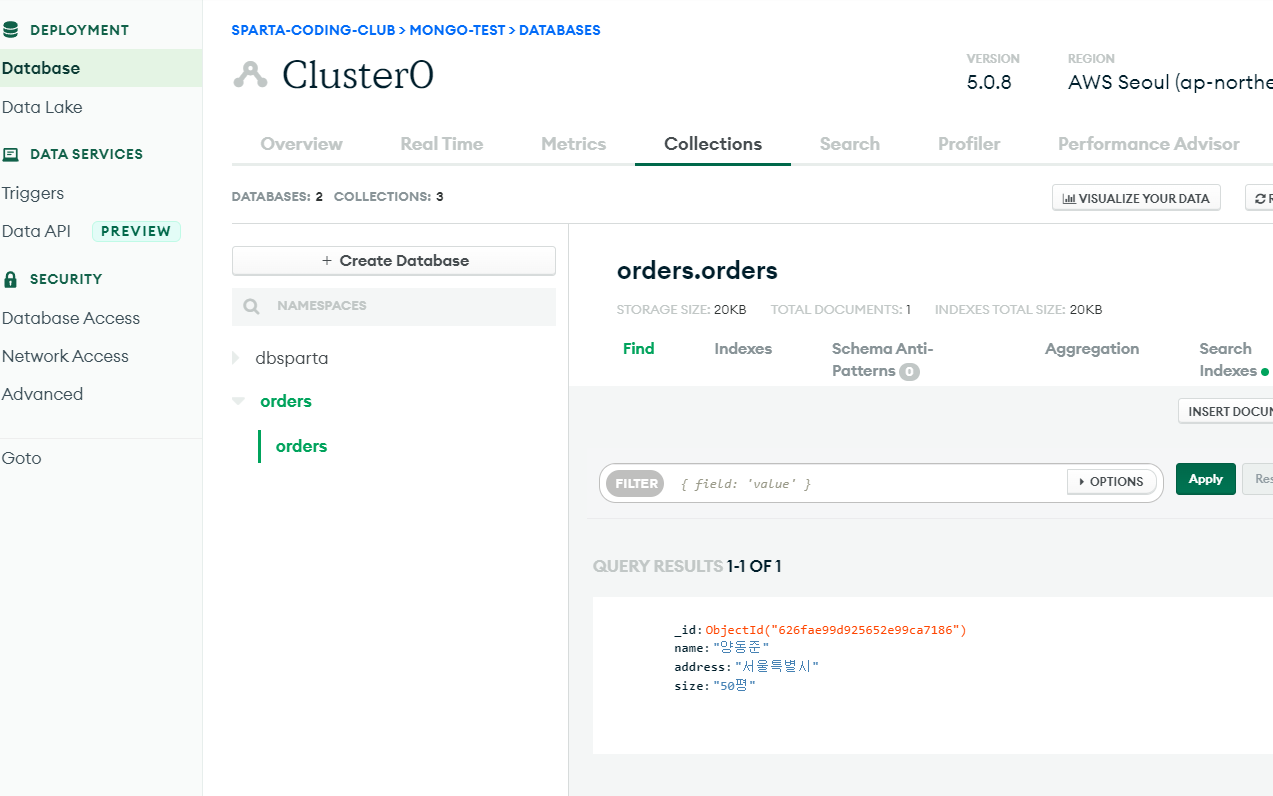
- 완성 확인하기
DB에 잘 들어갔는지 확인.
[ 08. 화성땅 공동구매 - GET 연습(주문 보여주기) ]
- API 만들고 사용하기 - 저장된 주문을 화면에 보여주기(Read → GET)
1. 요청 정보 : URL= /mars, 요청 방식 = GET
2. 클라(ajax) → 서버(flask) : (없음)
3. 서버(flask) → 클라(ajax) : 전체 주문을 보내주기
- 클라이언트와 서버 확인하기
1. [서버 코드 - app.py] - 기본 통신을 위한 코드
@app.route("/mars", methods=["GET"])
def mars_get():
    return jsonify({'msg': 'GET 연결 완료!'})
2. [클라이언트 코드 - index.html] - 기본 통신을 위한 코드
$(document).ready(function () {
    show_order();
});
function show_order() {
    $.ajax({
        type: 'GET',
        url: '/mars',
        data: {},
        success: function (response) {
            alert(response['msg'])
        }
    });
}
- 서버부터 만들기
받을 것 없이 orders에 주문정보를 담아서 내려주면 끝.
@app.route("/mars", methods=["GET"])
def mars_get():
    orders_list = list(db.orders.find({},{'_id':False}))
    return jsonify({'orders':orders_list})
- 클라이언트 만들기
응답을 잘 받아서 for 문으로! 붙여주면 끝
function show_order() {
    $('#order-box').empty()
    $.ajax({
        type: 'GET',
        url: '/mars',
        data: {},
        success: function (response) {
            let rows = response['orders']
            for (let i = 0; i < rows.length; i++) {
                let name = rows[i]['name']
                let address = rows[i]['address']
                let size = rows[i]['size']

                let temp_html = `<tr>
                                    <td>${name}</td>
                                    <td>${address}</td>
                                    <td>${size}</td>
                                  </tr>`
                $('#order-box').append(temp_html)
            }

        }
    });
}
- 전체 완성 코드
1. [서버 코드 - app.py]
from flask import Flask, render_template, request, jsonify
import certifi
from pymongo import MongoClient

ca = certifi.where()
client = MongoClient('mongodb+srv://djyang:Y8nhaIHKTB83FHmW@cluster0.bht8c.mongodb.net/Cluster0?retryWrites=true&w=majority', tlsCAFile=ca)
db = client.dbsparta

app = Flask(__name__)

@app.route('/')
def home():
   return render_template('index.html')

@app.route("/mars", methods=["POST"])
def mars_post():
    name_receive = request.form['name_give']
    address_receive = request.form['address_give']
    size_receive = request.form['size_give']

    doc = {
        'name': name_receive,
        'address': address_receive,
        'size': size_receive
    }

    db.orders.insert_one(doc)

    return jsonify({'msg': '주문 완료!'})

@app.route("/mars", methods=["GET"])
def mars_get():
    orders_list = list(db.orders.find({},{'_id':False}))
    return jsonify({'orders':orders_list})

if __name__ == '__main__':
   app.run('0.0.0.0', port=5000, debug=True)
2. [클라이언트 코드 - index.html]
<!DOCTYPE html>
<html lang="en">
<head>
    <meta charset="UTF-8">
    <meta http-equiv="X-UA-Compatible" content="IE=edge">
    <meta name="viewport" content="width=device-width, initial-scale=1.0">

    <link href="https://cdn.jsdelivr.net/npm/bootstrap@5.0.2/dist/css/bootstrap.min.css" rel="stylesheet"
        integrity="sha384-EVSTQN3/azprG1Anm3QDgpJLIm9Nao0Yz1ztcQTwFspd3yD65VohhpuuCOmLASjC" crossorigin="anonymous">
    <script src="https://ajax.googleapis.com/ajax/libs/jquery/3.5.1/jquery.min.js"></script>
    <script src="https://cdn.jsdelivr.net/npm/bootstrap@5.0.2/dist/js/bootstrap.bundle.min.js"
        integrity="sha384-MrcW6ZMFYlzcLA8Nl+NtUVF0sA7MsXsP1UyJoMp4YLEuNSfAP+JcXn/tWtIaxVXM"
        crossorigin="anonymous"></script>

    <link href="https://fonts.googleapis.com/css2?family=Gowun+Batang:wght@400;700&display=swap" rel="stylesheet">

    <title>선착순 공동구매</title>

    <style>
        * {
            font-family: 'Gowun Batang', serif;
            color: white;
        }

        body {
            background-image: linear-gradient(0deg, rgba(0, 0, 0, 0.5), rgba(0, 0, 0, 0.5)), url('https://cdn.aitimes.com/news/photo/202010/132592_129694_3139.jpg');
            background-position: center;
            background-size: cover;
        }

        h1 {
            font-weight: bold;
        }

        .order {
            width: 500px;
            margin: 60px auto 0px auto;
            padding-bottom: 60px;
        }

        .mybtn {
            width: 100%;
        }

        .order > table {
            margin : 40px 0;
            font-size: 18px;
        }

        option {
            color: black;
        }
    </style>
    <script>
        $(document).ready(function () {
            show_order();
        });
        function show_order() {
            $('#order-box').empty()
            $.ajax({
                type: 'GET',
                url: '/mars',
                data: {},
                success: function (response) {
                    let rows = response['orders']
                    for (let i = 0; i < rows.length; i++) {
                        let name = rows[i]['name']
                        let address = rows[i]['address']
                        let size = rows[i]['size']

                        let temp_html = `<tr>
                                            <td>${name}</td>
                                            <td>${address}</td>
                                            <td>${size}</td>
                                          </tr>`
                        $('#order-box').append(temp_html)
                    }

                }
            });
        }
        function save_order() {
            let name = $('#name').val()
            let address = $('#address').val()
            let size = $('#size').val()

            $.ajax({
                type: 'POST',
                url: '/mars',
                data: { name_give:name, address_give:address, size_give:size },
                success: function (response) {
                    alert(response['msg'])
                    window.location.reload()
                }
            });
        }
    </script>
</head>
<body>
    <div class="mask"></div>
    <div class="order">
        <h1>화성에 땅 사놓기!</h1>
        <h3>가격: 평 당 500원</h3>
        <p>
            화성에 땅을 사둘 수 있다고?<br/>
            앞으로 백년 간 오지 않을 기회. 화성에서 즐기는 노후!
        </p>
        <div class="order-info">
            <div class="input-group mb-3">
                <span class="input-group-text">이름</span>
                <input id="name" type="text" class="form-control">
            </div>
            <div class="input-group mb-3">
                <span class="input-group-text">주소</span>
                <input id="address" type="text" class="form-control">
            </div>
            <div class="input-group mb-3">
                <label class="input-group-text" for="size">평수</label>
                <select class="form-select" id="size">
                  <option selected>-- 주문 평수 --</option>
                  <option value="10평">10평</option>
                  <option value="20평">20평</option>
                  <option value="30평">30평</option>
                  <option value="40평">40평</option>
                  <option value="50평">50평</option>
                </select>
              </div>
              <button onclick="save_order()" type="button" class="btn btn-warning mybtn">주문하기</button>
        </div>
        <table class="table">
            <thead>
              <tr>
                <th scope="col">이름</th>
                <th scope="col">주소</th>
                <th scope="col">평수</th>
              </tr>
            </thead>
            <tbody id="order-box">
              <tr>
                <td>홍길동</td>
                <td>서울시 용산구</td>
                <td>20평</td>
              </tr>
              <tr>
                <td>임꺽정</td>
                <td>부산시 동구</td>
                <td>10평</td>
              </tr>
              <tr>
                <td>세종대왕</td>
                <td>세종시 대왕구</td>
                <td>30평</td>
              </tr>
            </tbody>
          </table>
    </div>
</body>
</html>
[ 09. 스파르타피디아 - 프로젝트 세팅 ]
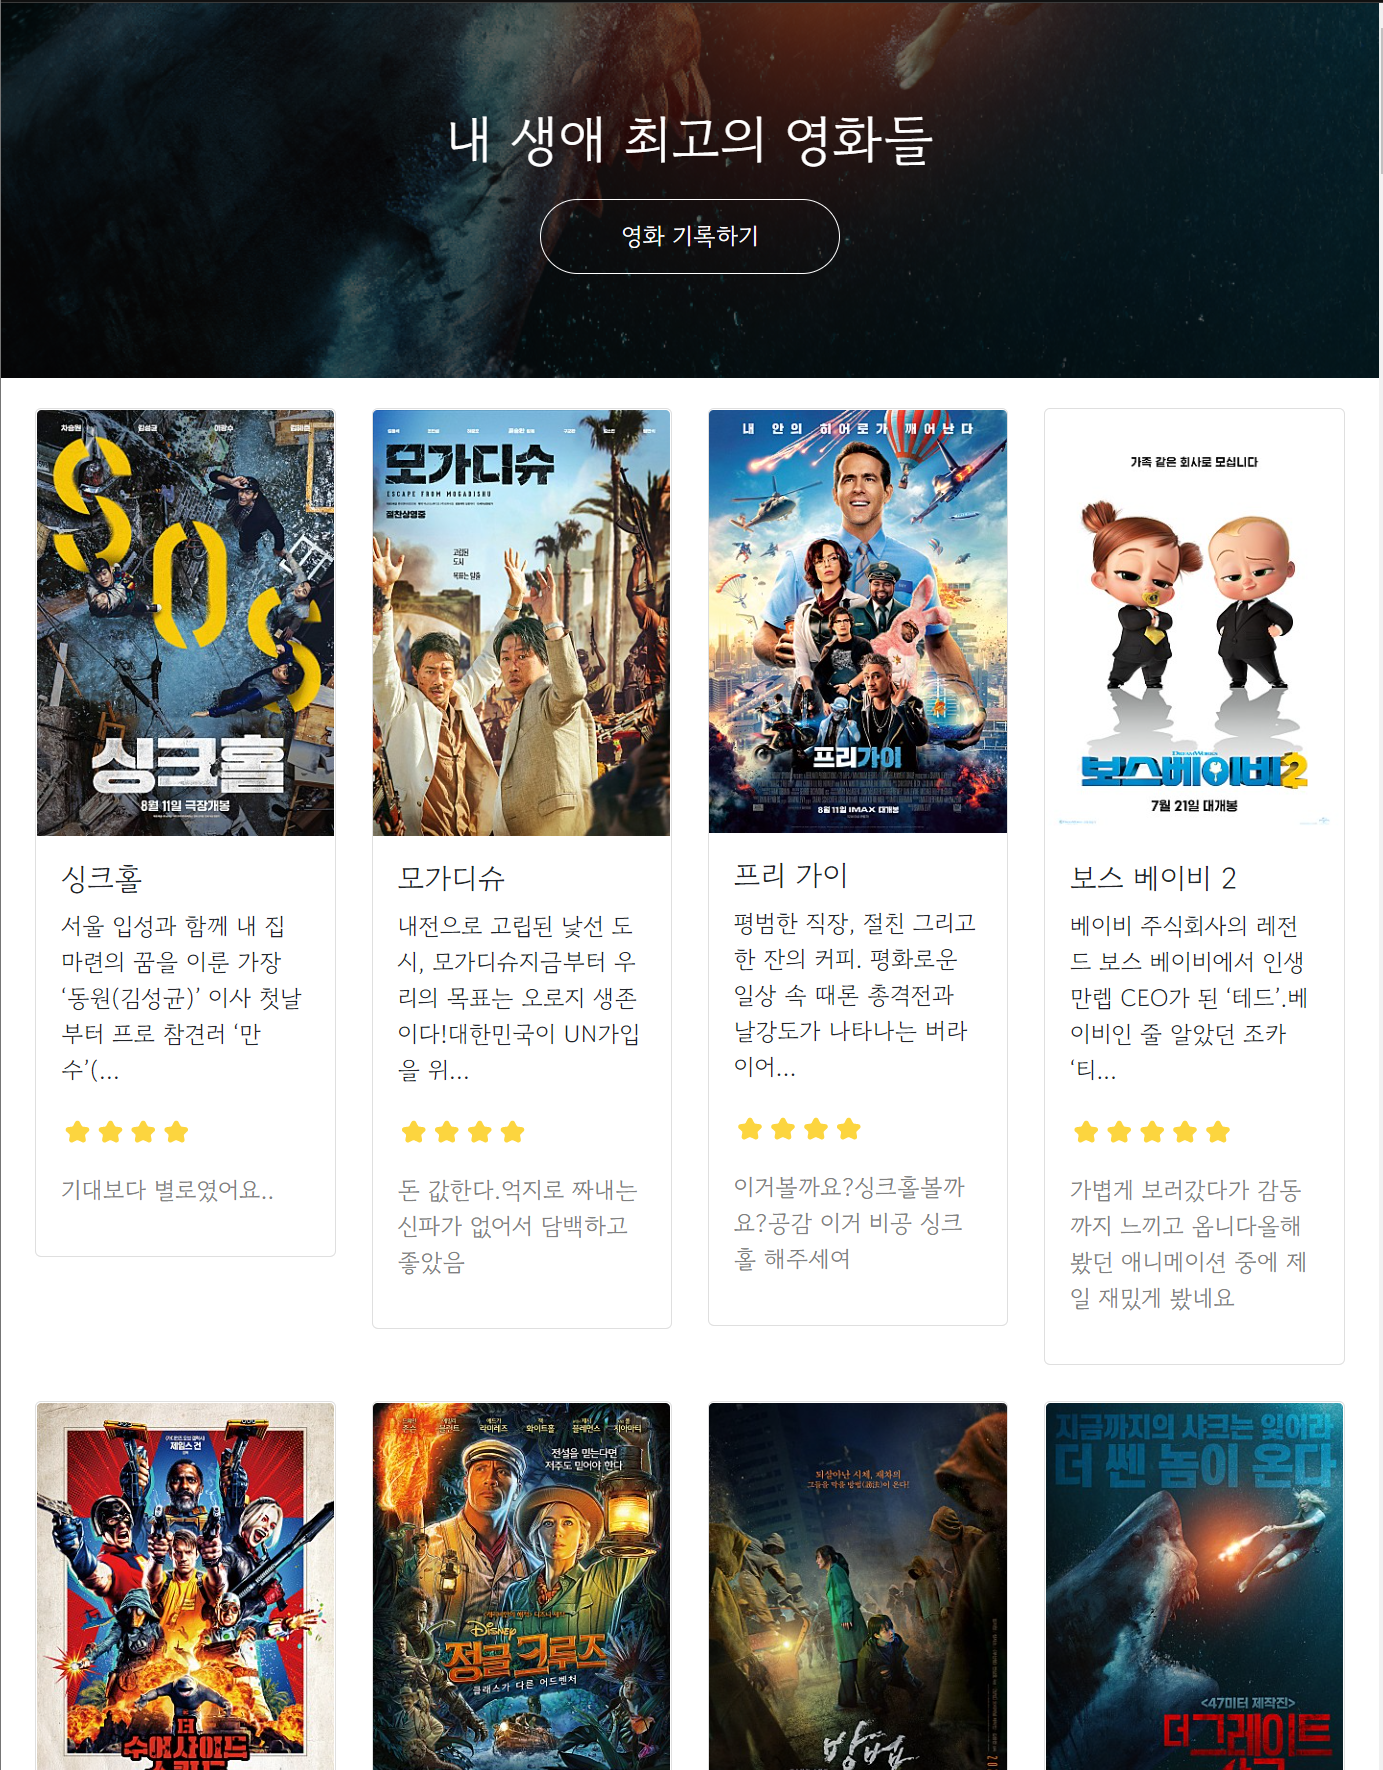
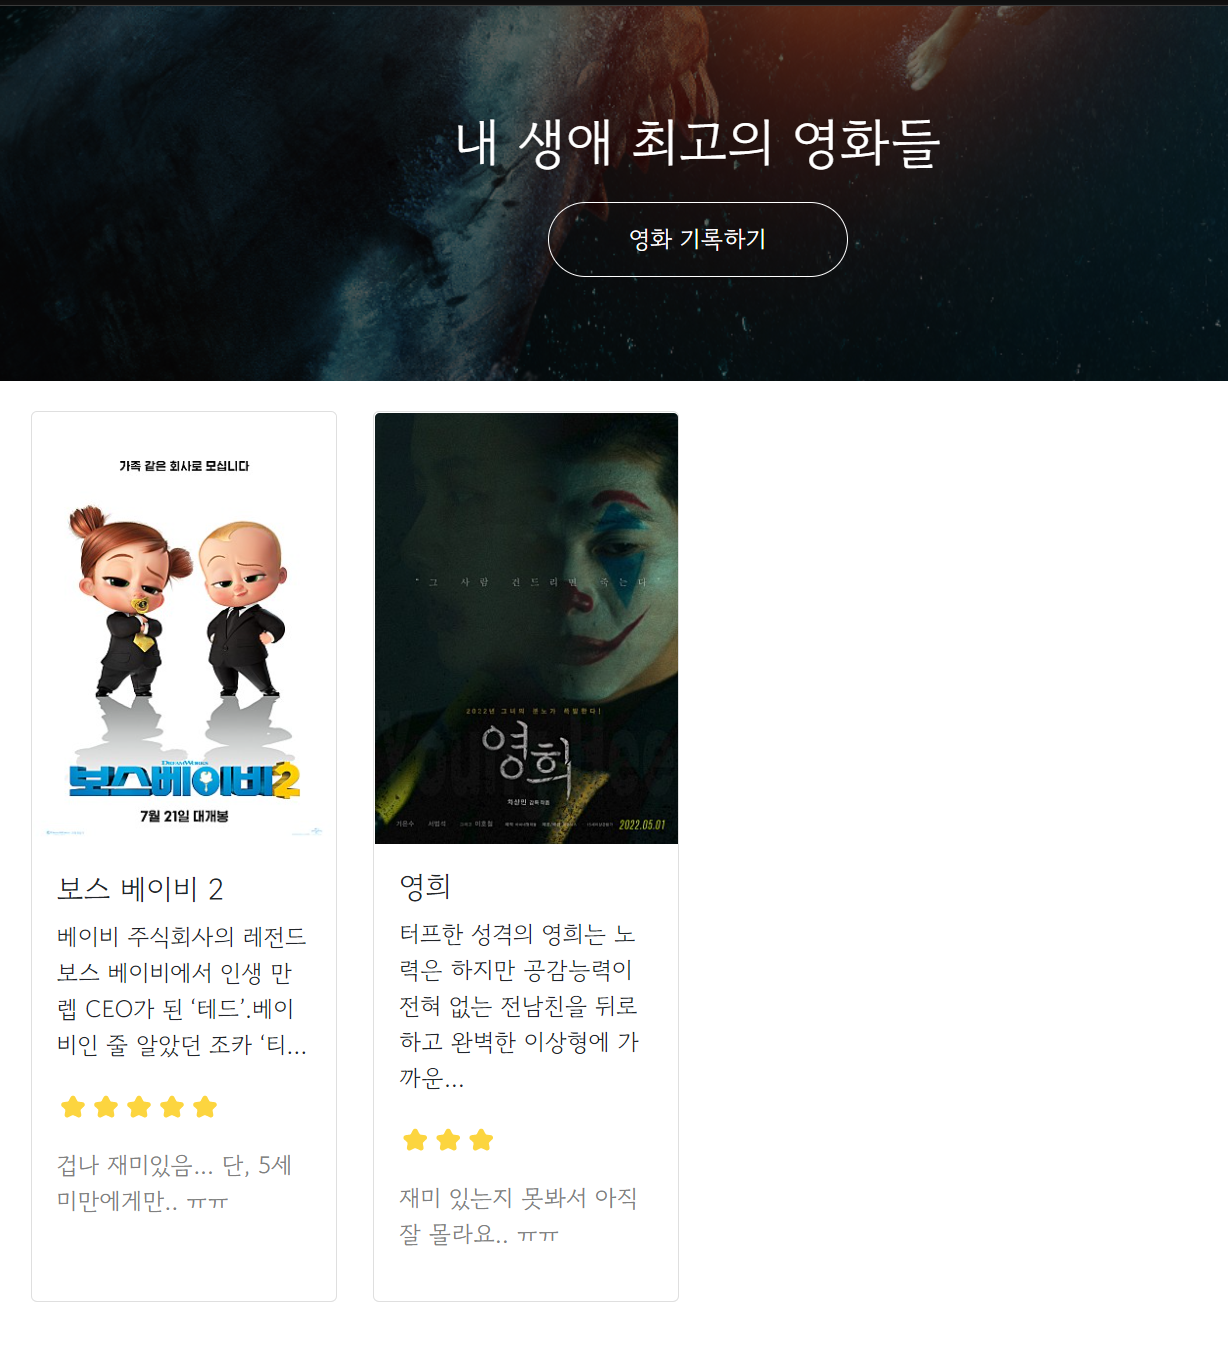
- 문제 분석 - 완성작부터 보기!
movie : "스파르타피디아" 관련 코드를 작성.
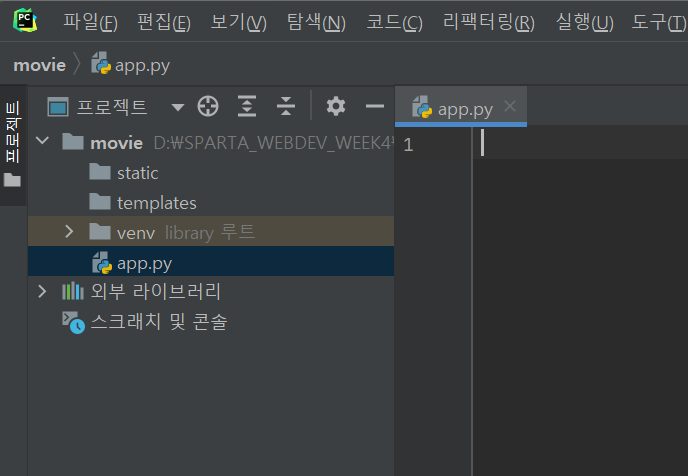
- 프로젝트 준비 - flask 폴더 구조 만들기
static, templates 폴더 생성, app.py 파일 생성
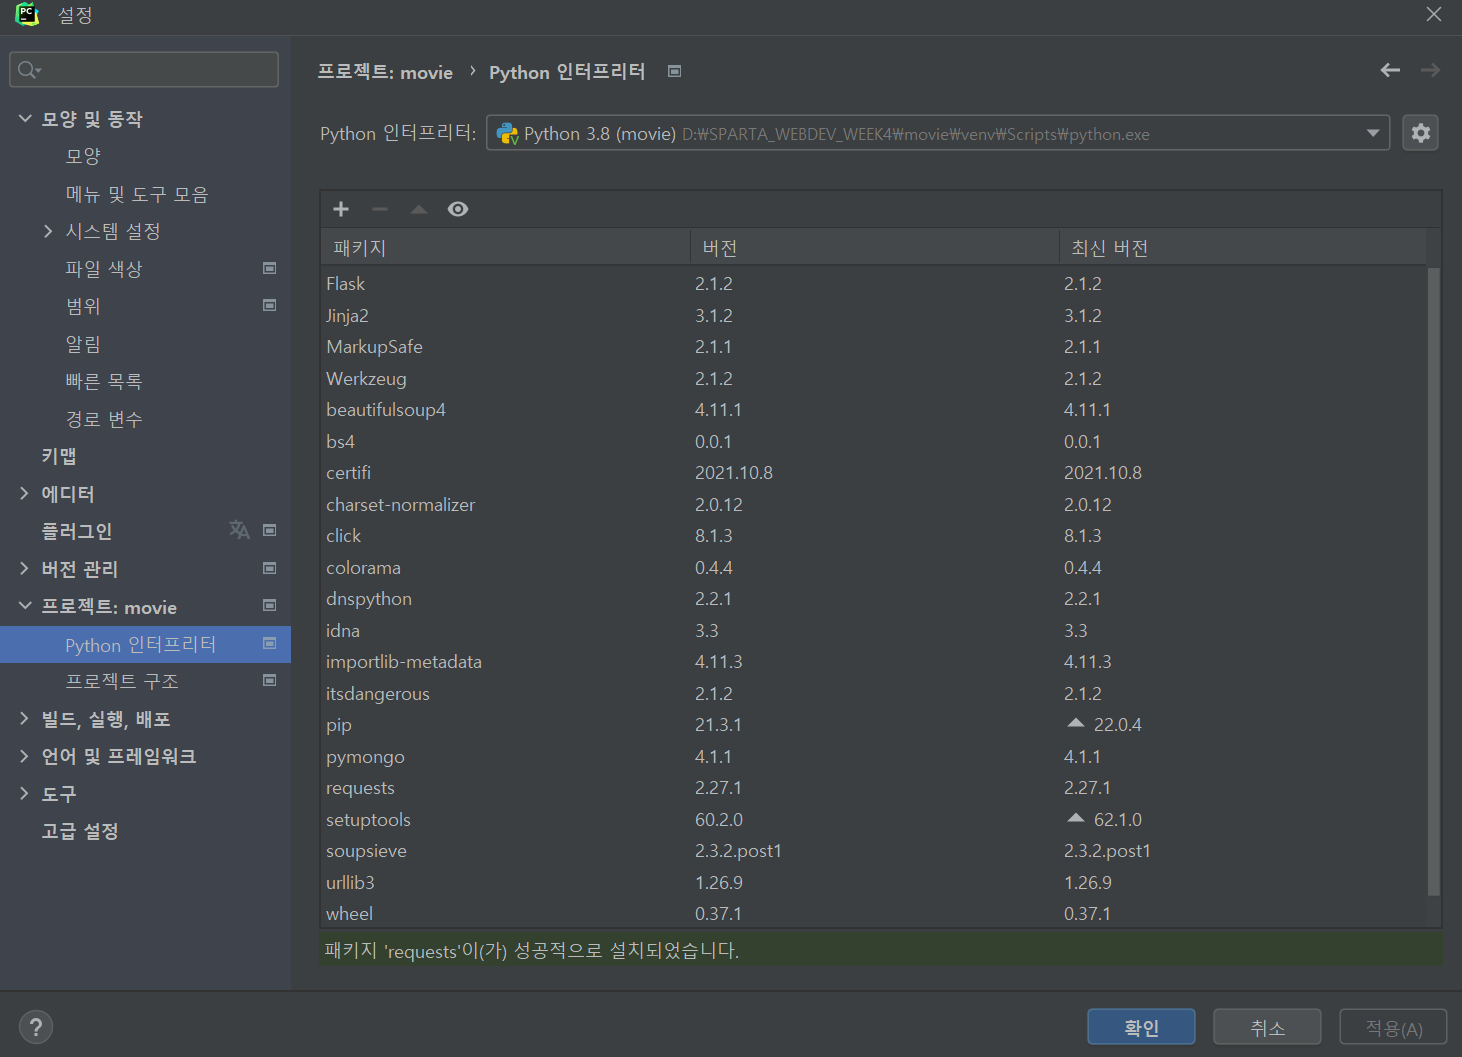
- 패키지 설치하기
5개 : flask, pymongo, dnspython, bs4, requests, certifi 추가하기
[ 10. 스파르타피디아 - 조각 기능 구현해보기 ]
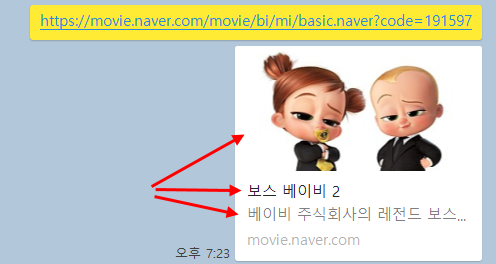
- 프로젝트 준비 - URL에서 페이지 정보 가져오기 (meta 태그 스크래핑)
1. meta tag가 뭔지를 알아보자.
URL만 입력했는데 자동으로 불러와지는 부분들이 있다. 예제에서는 제목, 썸네일 이미지, 내용 이 그것인다.
이 부분은 meta 태그를 크롤링 함으로써 공통적으로 얻을 수 있음.

2. meta 태그에 대해서 알아보기
(링크)에 접속한 뒤 크롬 개발자 도구를 이용해 HTML의 생김새를 살펴보자.
메타 태그는, <head></head> 부분에 들어가는, 눈으로 보이는 것(body) 외에 사이트의 속성을 설명해주는 태그들.
예) 구글 검색 시 표시 될 설명문, 사이트 제목, 카톡 공유 시 표시 될 이미지 등
여기 예제는 그 중 og:image / og:title / og:description 을 크롤링 할 예정
3. 크롤링 기본 코드
import requests
from bs4 import BeautifulSoup

url = 'https://movie.naver.com/movie/bi/mi/basic.naver?code=191597'

headers = {'User-Agent' : 'Mozilla/5.0 (Windows NT 10.0; Win64; x64)AppleWebKit/537.36 (KHTML, like Gecko) Chrome/73.0.3683.86 Safari/537.36'}
data = requests.get(url,headers=headers)

soup = BeautifulSoup(data.text, 'html.parser')

# 여기에 코딩을 해서 meta tag를 먼저 가져와보겠습니다.
3. meta 태그 스크래핑 하기
연습을 위해 meta_prac.py 파일을 만들어서 테스트 해 보자.
select_one을 이용해 meta tag를 먼저 가져와보자.
og_image = soup.select_one('meta[property="og:image"]')
og_title = soup.select_one('meta[property="og:title"]')
og_description = soup.select_one('meta[property="og:description"]')

print(og_image)
print(og_title)
print(og_description)
4. 가져온 meta 태그의 content를 가져와 보자.
image = og_image['content']
title = og_title['content']
description = og_description['content']

print(image)
print(title)
print(description)
5. 부분 완성 코드
import requests
from bs4 import BeautifulSoup

url = 'https://movie.naver.com/movie/bi/mi/basic.naver?code=191597'

headers = {'User-Agent' : 'Mozilla/5.0 (Windows NT 10.0; Win64; x64)AppleWebKit/537.36 (KHTML, like Gecko) Chrome/73.0.3683.86 Safari/537.36'}
data = requests.get(url,headers=headers)

soup = BeautifulSoup(data.text, 'html.parser')


# 여기에 코딩을 해서 meta tag를 먼저 가져와보겠습니다.

og_image = soup.select_one('meta[property="og:image"]')
og_title = soup.select_one('meta[property="og:title"]')
og_description = soup.select_one('meta[property="og:description"]')

print(og_image)
print(og_title)
print(og_description)


image = og_image['content']
title = og_title['content']
description = og_description['content']

print(image)
print(title)
print(description)
[ 11. 스파르타피디아 - 뼈대 준비하기 ]
- 프로젝트 준비 - app.py, index.html 준비하기
1. 스파르타피디아-app.py
from flask import Flask, render_template, request, jsonify
app = Flask(__name__)

@app.route('/')
def home():
   return render_template('index.html')

@app.route("/movie", methods=["POST"])
def movie_post():
    sample_receive = request.form['sample_give']
    print(sample_receive)
    return jsonify({'msg':'POST 연결 완료!'})

@app.route("/movie", methods=["GET"])
def movie_get():
    return jsonify({'msg':'GET 연결 완료!'})

if __name__ == '__main__':
   app.run('0.0.0.0', port=5000, debug=True)
2. 스파르타피디아-index.html
<!doctype html>
<html lang="en">

<head>
    <meta charset="utf-8">
    <meta name="viewport" content="width=device-width, initial-scale=1, shrink-to-fit=no">

    <link href="https://cdn.jsdelivr.net/npm/bootstrap@5.0.2/dist/css/bootstrap.min.css" rel="stylesheet"
          integrity="sha384-EVSTQN3/azprG1Anm3QDgpJLIm9Nao0Yz1ztcQTwFspd3yD65VohhpuuCOmLASjC" crossorigin="anonymous">
    <script src="https://ajax.googleapis.com/ajax/libs/jquery/3.5.1/jquery.min.js"></script>
    <script src="https://cdn.jsdelivr.net/npm/bootstrap@5.0.2/dist/js/bootstrap.bundle.min.js"
            integrity="sha384-MrcW6ZMFYlzcLA8Nl+NtUVF0sA7MsXsP1UyJoMp4YLEuNSfAP+JcXn/tWtIaxVXM"
            crossorigin="anonymous"></script>

    <title>스파르타 피디아</title>

    <link href="https://fonts.googleapis.com/css2?family=Gowun+Dodum&display=swap" rel="stylesheet">

    <style>
        * {
            font-family: 'Gowun Dodum', sans-serif;
        }

        .mytitle {
            width: 100%;
            height: 250px;

            background-image: linear-gradient(0deg, rgba(0, 0, 0, 0.5), rgba(0, 0, 0, 0.5)), url('https://movie-phinf.pstatic.net/20210715_95/1626338192428gTnJl_JPEG/movie_image.jpg');
            background-position: center;
            background-size: cover;

            color: white;

            display: flex;
            flex-direction: column;
            align-items: center;
            justify-content: center;
        }

        .mytitle > button {
            width: 200px;
            height: 50px;

            background-color: transparent;
            color: white;

            border-radius: 50px;
            border: 1px solid white;

            margin-top: 10px;
        }

        .mytitle > button:hover {
            border: 2px solid white;
        }

        .mycomment {
            color: gray;
        }

        .mycards {
            margin: 20px auto 0px auto;
            width: 95%;
            max-width: 1200px;
        }

        .mypost {
            width: 95%;
            max-width: 500px;
            margin: 20px auto 0px auto;
            padding: 20px;
            box-shadow: 0px 0px 3px 0px gray;

            display: none;
        }

        .mybtns {
            display: flex;
            flex-direction: row;
            align-items: center;
            justify-content: center;

            margin-top: 20px;
        }
        .mybtns > button {
            margin-right: 10px;
        }
    </style>
    <script>
        $(document).ready(function(){
          listing();
        });

        function listing() {
            $.ajax({
                type: 'GET',
                url: '/movie',
                data: {},
                success: function (response) {
                    alert(response['msg'])
                }
            })
        }

        function posting() {
            $.ajax({
                type: 'POST',
                url: '/movie',
                data: {sample_give: '데이터전송'},
                success: function (response) {
                    alert(response['msg'])
                }
            });
        }

        function open_box(){
            $('#post-box').show()
        }
        function close_box(){
            $('#post-box').hide()
        }
    </script>
</head>

<body>
<div class="mytitle">
    <h1>내 생애 최고의 영화들</h1>
    <button onclick="open_box()">영화 기록하기</button>
</div>
<div class="mypost" id="post-box">
    <div class="form-floating mb-3">
        <input id="url" type="email" class="form-control" placeholder="name@example.com">
        <label>영화URL</label>
    </div>
    <div class="input-group mb-3">
        <label class="input-group-text" for="inputGroupSelect01">별점</label>
        <select class="form-select" id="star">
            <option selected>-- 선택하기 --</option>
            <option value="1">⭐</option>
            <option value="2">⭐⭐</option>
            <option value="3">⭐⭐⭐</option>
            <option value="4">⭐⭐⭐⭐</option>
            <option value="5">⭐⭐⭐⭐⭐</option>
        </select>
    </div>
    <div class="form-floating">
        <textarea id="comment" class="form-control" placeholder="Leave a comment here"></textarea>
        <label for="floatingTextarea2">코멘트</label>
    </div>
    <div class="mybtns">
        <button onclick="posting()" type="button" class="btn btn-dark">기록하기</button>
        <button onclick="close_box()" type="button" class="btn btn-outline-dark">닫기</button>
    </div>
</div>
<div class="mycards">
    <div class="row row-cols-1 row-cols-md-4 g-4" id="cards-box">
        <div class="col">
            <div class="card h-100">
                <img src="https://movie-phinf.pstatic.net/20210728_221/1627440327667GyoYj_JPEG/movie_image.jpg"
                     class="card-img-top">
                <div class="card-body">
                    <h5 class="card-title">영화 제목이 들어갑니다</h5>
                    <p class="card-text">여기에 영화에 대한 설명이 들어갑니다.</p>
                    <p>⭐⭐⭐</p>
                    <p class="mycomment">나의 한줄 평을 씁니다</p>
                </div>
            </div>
        </div>
    </div>
</div>
</body>

</html>
[ 12. 스파르타피디아 - POST 연습(포스팅하기) ]
- 본격적으로 API 만들고 사용하기 - 포스팅 API (Create -> POST)
1. 요청 정보 : URL= /movie, 요청 방식 = POST
2. 클라(ajax) → 서버(flask) : url, star, comment
3. 서버(flask) → 클라(ajax) : 메시지를 보냄 (포스팅 완료!)
- 기본의 클라이언트와 서버 연결 확인하기 코드
서버단 기본 코드 - app.py
@app.route("/movie", methods=["POST"])
def movie_post():
    sample_receive = request.form['sample_give']
    print(sample_receive)
    return jsonify({'msg':'POST 연결 완료!'})
클라이언트단 기본 코드 - index.html
function posting() {
    $.ajax({
        type: 'POST',
        url: '/movie',
        data: {sample_give: '데이터전송'},
        success: function (response) {
            alert(response['msg'])
        }
    });
}

<button onclick="posting()" type="button" class="btn btn-dark">기록하기</button>
- 서버부터 만들기
url, star, comment정보를 받아서, 저장하면 되겠죠?
그리고, 우리가 미리 만든 meta_prac.py도 참고해서 붙여봅시다!
우리가 일전에 만들어둔 dbtest.py 파일을 불러와봅시다!
from flask import Flask, render_template, request, jsonify
import certifi
from pymongo import MongoClient
from bs4 import BeautifulSoup
import requests

ca = certifi.where()
client = MongoClient('mongodb+srv://djyang:Y8nhaIHKTB83FHmW@cluster0.bht8c.mongodb.net/Cluster0?retryWrites=true&w=majority', tlsCAFile=ca)
db = client.dbsparta


app = Flask(__name__)

@app.route('/')
def home():
   return render_template('index.html')

@app.route("/movie", methods=["POST"])
def movie_post():
    url_receive = request.form['url_give']
    star_receive = request.form['star_give']
    comment_receive = request.form['comment_give']

    headers = {
        'User-Agent': 'Mozilla/5.0 (Windows NT 10.0; Win64; x64)AppleWebKit/537.36 (KHTML, like Gecko) Chrome/73.0.3683.86 Safari/537.36'}
    data = requests.get(url_receive, headers=headers)

    soup = BeautifulSoup(data.text, 'html.parser')

    og_image = soup.select_one('meta[property="og:image"]')
    og_title = soup.select_one('meta[property="og:title"]')
    og_description = soup.select_one('meta[property="og:description"]')

    image = og_image['content']
    title = og_title['content']
    description = og_description['content']

    doc = {
        'image':image,
        'title':title,
        'desc':description,
        'star':star_receive,
        'comment':comment_receive
    }

    db.movies.insert_one(doc)

    return jsonify({'msg':'POST 연결 완료!'})

@app.route("/movie", methods=["GET"])
def movie_get():
    return jsonify({'msg':'GET 연결 완료!'})

if __name__ == '__main__':
   app.run('0.0.0.0', port=5000, debug=True)
- 클라이언트 만들기
이번엔 url, star, comment정보를 보내주면 되겠죠?
function posting() {
    let url = $('#url').val()
    let star = $('#star').val()
    let comment = $('#comment').val()

    $.ajax({
        type: 'POST',
        url: '/movie',
        data: {url_give: url, star_give: star, comment_give: comment},
        success: function (response) {
            alert(response['msg'])
            window.location.reload()
        }
    });
}
- 실행 결과 - mongoDB에 정상적으로 입력 확인

[ 13. 스파르타피디아 - GET 연습(보여주기) ]
- API 만들고 사용하기 - 보여주기API (Read → GET)
1. 요청 정보 : URL= /movie, 요청 방식 = GET
2. 클라(ajax) → 서버(flask) : (없음)
3. 서버(flask) → 클라(ajax) : 전체 영화를 보내주기
- 클라이언트와 서버 확인하기(기본 통신 코드)
서버 코드
@app.route("/movie", methods=["GET"])
def movie_get():
    return jsonify({'msg':'GET 연결 완료!'})
클라이언트 코드
$(document).ready(function(){
	  listing();
});

function listing() {
    $.ajax({
        type: 'GET',
        url: '/movie',
        data: {},
        success: function (response) {
            alert(response['msg'])
        }
    })
}
- 서버부터 만들기
받을 것 없이 orders 에 주문정보를 담아서 내려주기만 하면 됩니다!
@app.route("/movie", methods=["GET"])
def movie_get():
    movie_list = list(db.movies.find({},{'_id':False}))
    return jsonify({'movies':movie_list})
- 클라이언트 만들기
응답을 잘 받아서 for 문으로! 붙여주면 끝이겠죠!
function listing() {
    $('#cards-box').empty()
    $.ajax({
        type: 'GET',
        url: '/movie',
        data: {},
        success: function (response) {
            let rows = response['movies']
            for(let i = 0; i < rows.length; i++) {
                let image = rows[i]['image']
                let title = rows[i]['title']
                let desc = rows[i]['desc']
                let star = rows[i]['star']
                let comment = rows[i]['comment']

                let star_image = '⭐'.repeat(star)

                let temp_html = `<div class="col">
                                    <div class="card h-100">
                                        <img src="${image}"
                                             class="card-img-top">
                                        <div class="card-body">
                                            <h5 class="card-title">${title}</h5>
                                            <p class="card-text">${desc}</p>
                                            <p>${star_image}</p>
                                            <p class="mycomment">${comment}</p>
                                        </div>
                                    </div>
                                </div>`

                $('#cards-box').append(temp_html)
            }
        }
    })
}
- 동작 확인하기
네이버 영화의 신규 URL을 등록하면 정상적으로 정보를 가져옴.
[ 14. 4주차 끝 & 과제 ]
- 완료 코드
1. 서버 코드 - app.py
from flask import Flask, render_template, request, jsonify
import certifi
from pymongo import MongoClient
# from bs4 import BeautifulSoup
# import requests

ca = certifi.where()
client = MongoClient('mongodb+srv://djyang:Y8nhaIHKTB83FHmW@cluster0.bht8c.mongodb.net/Cluster0?retryWrites=true&w=majority', tlsCAFile=ca)
db = client.dbsparta


app = Flask(__name__)

@app.route('/')
def home():
   return render_template('index.html')

@app.route("/homework", methods=["POST"])
def homework_post():
    name_receive = request.form["name_give"]
    comment_receive = request.form["comment_give"]

    doc = {
        'name': name_receive,
        'comment': comment_receive
    }

    db.homework.insert_one(doc)
    return jsonify({'msg':'응원 완료!'})

@app.route("/homework", methods=["GET"])
def homework_get():
    comment_list = list(db.homework.find({},{'_id':False}))
    return jsonify({'comments':comment_list})


if __name__ == '__main__':
   app.run('0.0.0.0', port=5000, debug=True)
2. 클라이언트 코드 - index.html
<!doctype html>
<html lang="en">

<head>
<meta charset="utf-8">
<meta name="viewport" content="width=device-width, initial-scale=1, shrink-to-fit=no">

<link href="https://cdn.jsdelivr.net/npm/bootstrap@5.0.2/dist/css/bootstrap.min.css" rel="stylesheet"
integrity="sha384-EVSTQN3/azprG1Anm3QDgpJLIm9Nao0Yz1ztcQTwFspd3yD65VohhpuuCOmLASjC" crossorigin="anonymous">
<script src="https://ajax.googleapis.com/ajax/libs/jquery/3.5.1/jquery.min.js"></script>
<script src="https://cdn.jsdelivr.net/npm/bootstrap@5.0.2/dist/js/bootstrap.bundle.min.js"
integrity="sha384-MrcW6ZMFYlzcLA8Nl+NtUVF0sA7MsXsP1UyJoMp4YLEuNSfAP+JcXn/tWtIaxVXM"
crossorigin="anonymous"></script>

<title>스파르타코딩클럽 | 부트스트랩 연습하기</title>
    <link href="https://fonts.googleapis.com/css2?family=Poor+Story&display=swap" rel="stylesheet">
    <style>
        * {
            font-family: 'Poor Story', cursive;
        }
        .mytitle {

            /*타이틀 구간의 높이를 250픽셀로 지정*/
            height: 250px;
            /*타이틀 구간의 넓이를 브라우저의 폭과 동일하게 100%로 사용*/
            width: 100%;

            /*항상 아래 세가지는 함께, 해당 오브젝트의 이미지를 특정 이미지로 채우고, 위치를 현재 있는 공간의 중앙으로 정렬함*/
            background-image: linear-gradient(0deg, rgba(0, 0, 0, 0.5), rgba(0, 0, 0, 0.5)), url("https://t1.daumcdn.net/cfile/tistory/991BBD335A1335EA23?download");
            background-position: center;
            background-size: cover;

            color: white;

            /*항상 아래 네가지는 함께..*/
            display: flex;
            flex-direction: column; /*colume 대신 row를 할 경우 오른쪽에 이어서 contents가 붙게 됨.*/
            justify-content: center;
            align-items: center;
        }

        .wrap {
            max-width: 500px;
            width: 95%;
            margin: 20px auto 0px auto;
        }

        .mypost {
            max-width: 500px;
            width: 95%;

            margin: 20px auto 0px auto;

            box-shadow: 0px 0px 3px 0px gray;

            padding: 20px;
        }

        .mybtn {
            margin: 10px auto 10px auto;
            display: flex;
            flex-direction: row; /*colume 대신 row를 할 경우 오른쪽에 이어서 contents가 붙게 됨.*/
            justify-content: left;
            align-items: center;
        }

    </style>
    <script>
        $(document).ready(function () {
            show_comment();
        });

        function save_comment() {
            let name = $('#name').val()
            let comment = $('#comment').val()

            $.ajax({
                type: "POST",
                url: "/homework",
                data: {'name_give': name, 'comment_give': comment},
                success: function (response) {
                    alert(response["msg"])
                    window.location.reload()
                }
            });
        }

        function show_comment() {
            $('#comment-list').empty()
            $.ajax({
                type: "GET",
                url: "/homework",
                data: {},
                success: function (response) {
                    let rows = response['comments']
                    for (let i = 0; i < rows.length; i++) {
                        let name = rows[i]['name']
                        let comment = rows[i]['comment']

                        let temp_html = `<div class="card">
                                            <div class="card-body">
                                                <blockquote class="blockquote mb-0">
                                                    <p>${comment}</p>
                                                    <footer class="blockquote-footer">${name}</footer>
                                                </blockquote>
                                            </div>
                                        </div>`
                        $('#comment-list').append(temp_html)
                    }
                }
            });
        }

        function q1() {
            $.ajax({
                type: "GET",
                url: "http://spartacodingclub.shop/sparta_api/weather/seoul",
                data: {},
                success: function (response) {
                    let temp = response['temp']
                    $('#temp').text(temp)
                }
            })
        };
        q1();
    </script>
</head>
<body>
<div class="mytitle">
    <h1>BTS(방탄소년단) 팬명록</h1>
    <p>현재 기온 : <span id="temp">00.00</span>도 </p>
</div>
<div class="mypost">
    <div class="form-floating mb-3">
        <input type="text" class="form-control" id="name" placeholder="url">
        <label for="floatingInput">닉네임</label>
    </div>
    <div class="form-floating">
            <textarea class="form-control" placeholder="Leave a comment here" id="comment"
                      style="height: 100px"></textarea>
        <label for="floatingTextarea2">응원댓글</label>
    </div>
    <button onclick="save_comment()" type="button" class="btn btn-dark">댓글 남기기</button>
</div>
<div class="wrap" id="comment-list">
    <div class="card">
        <div class="card-body">
            <blockquote class="blockquote mb-0">
                <p>새로운 앨범 너무 멋져요!</p>
                <footer class="blockquote-footer">호빵맨</footer>
            </blockquote>
        </div>
    </div>
    <div class="card">
        <div class="card-body">
            <blockquote class="blockquote mb-0">
                <p>새로운 앨범 너무 멋져요!</p>
                <footer class="blockquote-footer">호빵맨</footer>
            </blockquote>
        </div>
    </div>
    <div class="card">
        <div class="card-body">
            <blockquote class="blockquote mb-0">
                <p>새로운 앨범 너무 멋져요!</p>
                <footer class="blockquote-footer">호빵맨</footer>
            </blockquote>
        </div>
    </div>
</div>
</body>
</html>
'ICT 학습' 카테고리의 다른 글
| 웹개발 종합반 - 3주차 (0) | 2022.04.29 |
|---|---|
| 이미지 처리로 시작하는 딥러닝 - 3주차 (0) | 2022.04.26 |
| 머신러닝 기본부터 다시 배우기 - 3주차 (0) | 2022.04.26 |
| 웹개발 종합반 - 2주차 (0) | 2022.04.25 |
| 이미지 처리로 시작하는 딥러닝 - 2주차 (0) | 2022.04.24 |


